Are you tired of juggling multiple apps and manually transferring data between them? Well, get ready to streamline your workflow with Albato – the ultimate automation platform that connects all your favorite apps and makes your life a whole lot easier.
What is Albato, you ask? Simply put, it’s like having a digital assistant that takes care of all the tedious tasks for you. Whether it’s syncing data between apps, scheduling reports, or automating routine tasks, Albato has got you covered. And the best part? You don’t need to be a coding wizard to use it!
So, let’s dive in and see how you can create your first automation with Albato in just a few simple steps.
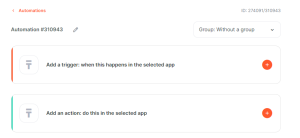
Step 1: Choose Your Trigger App To get started, head over to the Automations section and click on “New”. This is where the magic happens. First, you need to pick the app that will trigger your automation. Let’s say you want to automatically send data from Trello to Google Sheets whenever a card is moved. In this case, your trigger app would be Trello.

Select Trello as your “From” app and choose the specific event that will kick off your automation, like “card moved from list to list”. If you haven’t connected your Trello account yet, no worries! Just click on “Add a connection” and follow the prompts to grant Albato access.
Step 2: Set Up Your Action App Next, it’s time to choose where you want to send that Trello data. In our example, we’ll select Google Sheets as our action app. Pick “Google Sheets” as your “Where to send” app and specify the action you want to perform, like “new spreadsheet row”. Again, if you haven’t connected your Google Sheets account, just follow the same process as before to add the connection.

Now, you’ll need to map the fields from Trello to the corresponding columns in your Google Sheets. Just click on each field and select the data you want to include from the drop-down menu. You can even combine static text with dynamic data from Trello. Pretty cool, right?
Step 3: Test and Launch Your Automation You’re almost there! Before you hit that “Start” button, it’s always a good idea to test your automation to make sure everything is working smoothly. Albato makes it super easy to do this. Just perform the trigger action in your app (in this case, move a card in Trello) and click the test button, which is located right next to the start button. Then watch as the data magically appears in your Google Sheets.
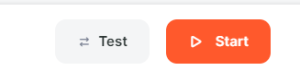
If everything looks good, go ahead and start your automation. From now on, whenever a card is moved in Trello, Albato will automatically send that data to your specified Google Sheets row. Talk about a time-saver!
And there you have it – your first automation with Albato! But this is just the tip of the iceberg. With Albato, you can create all sorts of automations to streamline your workflow and boost your productivity. From sending notifications to your team when a new lead comes in, to automatically updating your inventory across multiple e-commerce platforms, the possibilities are endless.
So what are you waiting for? Sign up for Albato today and start automating your way to success. Trust me, your future self will thank you for it.
Happy automating!

